Getting Started with HEROS
This guide is the best way to get you started with the Atomiq One software stack.
A basic understanding of a few tools and concepts is assumed, so we recommend familiarising yourself with the following topics:
- uv
A modern python virtual environment manager. You need uv installed on your system.
- CLI
Basic usage of a command line interface like bash.
Tip
For this guide we start with setting up the non-realtime part. If you want to only run ARTIQ with Atomiq or want to start with the realtime part, jump to Getting Started with Atomiq.
Tip
Also check out our “From Zero to HERO in 45 Minutes” webinar!
Setting up your first HERO
Create a new folder and navigate to it. In this tutorial we call the folder my_first_hero. Now run:
uv venv
uv pip install heros-boss herosdevices
Now we need to create a definitions file for BOSS () to know what python class it should make into a HERO:
{
  "_id": "my_first_hero",
  "classname": "herosdevices.hardware.dummy.camera.CameraDummy",
  "arguments": {
    "config_dict":{"default":{"height":200, "width":200, "frame_count":-1, "auto_trigger":false}}
  }
}
The _id key is the name of the HERO under which it is identified in the network. classname is the full path of the Python class to be used.
In this example, we use the dummy camera object from herosdevices (), which takes a configuration dictionary as argument in its init function to configure among others the height and width of the generated image.
Tip
Learn more about the configuration syntax beyond this tutorial here.
To start the HERO, run:
uv run boss -u file://${PWD}/my_first_hero.json
This process now runs indefinitely and provides an interface to the underlying class to the network.
Interacting with your HERO
Important
To be able to automatically discover HEROS in the network, you need to open the ports 7447/tcp and 7446/udp (broadcast). Also make sure that multicast is enabled.
Note
You can do this on any machine on the same network as the machine running the BOSS command above.
To interact with your new hero (besides through code as we will see in the next section), you can use the HERO monitor.
Therefore open a new terminal, navigate to your my_first_hero directory and run
uv pip install git+https://gitlab.com/atomiq-project/hero-monitor
uv run hero-monitor
A window will open where the my_first_hero is visible in the list to the left. Double clicking it will display its remote interface:
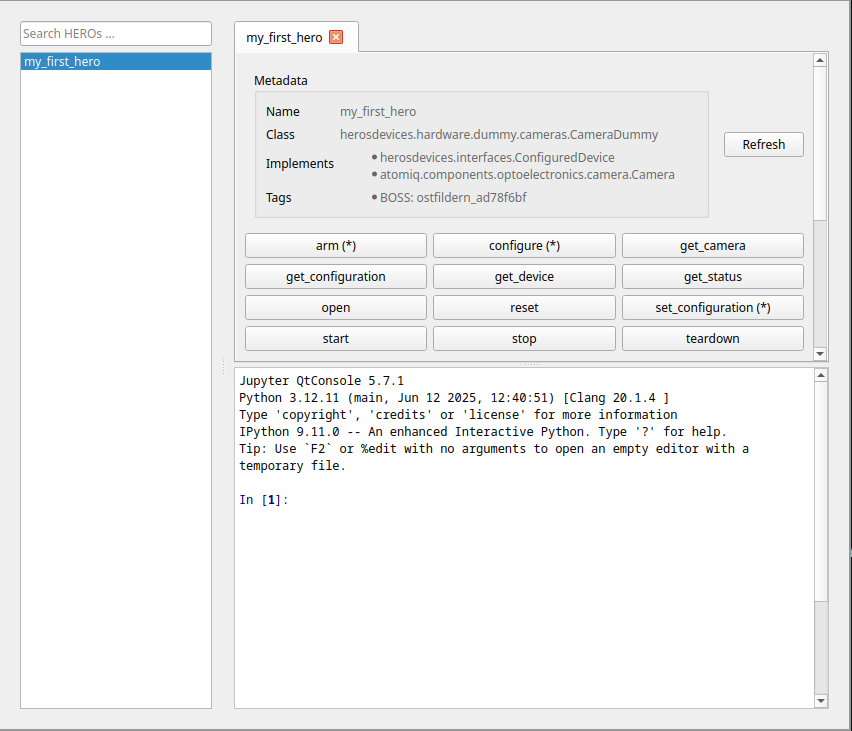
There you can run functions of the remote dummy camera by pressing the shown buttons or manipulate its attributes directly.
Tip
The Jupyter console at the bottom allows to run more complicated functions. Use obj. to access the remote object (e.g. obj.arm(metadata={"name":"my_picture"})). You can press tab for autocompletion.
Pressing the arm (*) [1] button now arms the camera, i.e. configures it and let it wait for an external trigger signal. The start functions then sends a software trigger to the camera and takes (or in our dummy case generates) an image.
This image is then send as an event into the network and can be captured at any point. You can see this in the BOSS log as:
Working with events
Now we will write a small program that captures the image data we can generate by calling the start method.
 from heros import RemoteHERO

 if __name__ == "__main__":
     my_first_hero_remote = RemoteHERO("my_first_hero")
     my_first_hero_remote.acquisition_data.connect(print)
This script first opens a connection to the remote HERO my_first_hero and then connects the standard Python print
function as a listener to the event acquisition_data which is emitted by my_first_hero when a picture is taken.
Run the script with uv run image_printer.py and press start in the HERO monitor of my_first_hero.
You can now observe that every time you press the start button, i.e. “take an image”, the image_printer program prints
output like:
[array([[2782,    0,    0, ...,    0,    0,    0],
    [   0, 3070, 1103, ...,    0,  496, 3043],
    [3281,    0,    0, ...,    0,    0, 2478],
    ...,
    [   0,    0,    0, ..., 3408,    0,    0],
    [2837, 4637,    0, ...,    0,    0,  115],
    [   0,    0,    0, ...,  673,    0,  161]],
   shape=(200, 200), dtype=uint16), {'frame': 1}]
The printed payload is an array with two elements, the image data itself and a dictionary with metadata. As we did not configure anything else [2], only the running number of the frame is in the metadata.
You can close the program now by pressing strg + c
Tip
You can also run the image_printer program on multiple machines simultaneously. Then you will observe that both print the emitted image.
This is an important tool to implement e.g. simultaneous data storage and evaluation pipelines.
Now let us expand the image_printer program to use our own function as callback:
 from heros import RemoteHERO

 def print_frame(payload: tuple) -> None:
     frame_num = payload[1]["frame"]
     print(f"Got an image with number {frame_num} and shape {payload[0].shape}")

 if __name__ == "__main__":
     my_first_hero_remote = RemoteHERO("my_first_hero")
     my_first_hero_remote.acquisition_data.connect(print_frame)
Now when generating images again, you will observe our print_frame function being called every time:
Got an image with number 7 and shape (200, 200)
Got an image with number 8 and shape (200, 200)
Got an image with number 9 and shape (200, 200)
Got an image with number 10 and shape (200, 200)
Tip
Learn more about events and callbacks here.
Up to this point we used the HERO Monitor GUI to trigger and arm the camera. Naturally we can also do this via Python code. Let’s expand our image printer script by these functions.
from heros import RemoteHERO

def print_frame(payload: tuple) -> None:
    frame_num = payload[1]["frame"]
    print(f"Got an image with number {frame_num} and shape {payload[0].shape}")

if __name__ == "__main__":
    my_first_hero_remote = RemoteHERO("my_first_hero")
    my_first_hero_remote.acquisition_data.connect(print_frame)

    # Check remote attribute if the camera is armed.
    if my_first_hero_remote.acquisition_running:

        # If it is already running, stop the previous acquisition
        print("Previous acquisition still running, stopping...")
        my_first_hero_remote.reset()

    # Arm the camera
    my_first_hero_remote.arm()

    # Check remote attribute again.
    print("acquisition_running:", my_first_hero_remote.acquisition_running)

    # Send software triggers to the camera
    for i in range(4):
        print("Sending trigger {i}...")
        my_first_hero_remote.start()
Notice how we simply call the methods and read/write the attributes of the remote object as though it were local.
Running the script again with uv run image_printer.py will generate the following (or similar) output:
Previous acquisition still running, stopping...
acquisition_running: True
Sending trigger {i}...
Sending trigger {i}...
Got an image with number 0 and shape (200, 200)
Sending trigger {i}...
Got an image with number 1 and shape (200, 200)
Sending trigger {i}...
Got an image with number 2 and shape (200, 200)
Got an image with number 3 and shape (200, 200)
Here we can see the asynchronous nature of the event mechanism: The first image arrives only after the second trigger is already sent.
Setting up a Sensor and Monitoring its state
Now we have seen how we can use HEROS to control a device and acquire data from it. Another important aspect of running a complex machine is continuously monitoring its state. In this section we will set up a small sensor, which automatically publishes its data to the network. From there, another process can gather that data and save it into a database.
Lets first set up the code for our dummy sensor:
import numpy as np

class DummySensor:

    scale: float = 1.0

    def __init__(self):
        self.value = 0

    def read_value(self):
        self.value = np.cos(self.value)
        return self.value
Here we set up a simple class which implements a read_value method, which returns a dummy “sensor” value.
With the JSON description for our dummy sensor
{
  "_id": "my_dummy_sensor",
  "classname": "my_sensor.DummySensor",
  "arguments": {},
  "datasource": {
    "interval": 30,
    "observables":{
      "my_sensor_value": {
        "target": "read_value",
        "unit": "°C"
      }
    }
  }
}
we can use BOSS to do all the heavy lifting again. By defining the datasource key, BOSS automatically creates and
observable_data event based on the defined observables and triggers/emits it every interval second (here every 30 second).
The entries in the observables dict tell BOSS that it should call the method read_value to get the observable my_sensor_value
and that the returned value has the unit “°C”.
Tip
Observables also support advanced features like conversions and bounds for the emitted values. Learn more about that here.
Note
Many of the device representations in herosdevices () also
implement a default set of observables which are emitted if the observables key is not specified.
If you want to directly use a real device in this tutorial, check out for example the device_DLPro Driver.
To capture the data from all your data sources, herostools () provides the
herostools.actor.statemachine.HERODatasourceStateMachine.
It captures all observable_data events and aggregates it together with a timestamp on a Prometheus-compatible endpoint.
Install it with:
uv pip install herostools
We can add it to our JSON description as follows:
{
  "rows": [
    {
      "_id": "my_dummy_sensor",
      "classname": "my_sensor.DummySensor",
      "arguments": {},
      "datasource": {
        "interval": 30,
        "observables":{
          "my_sensor_value": {
            "target": "read_value",
            "unit": "°C"
          }
        }
      }
    },
    {
      "_id": "statemachine",
      "classname": "herostools.actor.statemachine.HERODatasourceStateMachine",
      "arguments": {
        "loop": "@_boss_loop",
        "http_port": 9099,
        "bind_address": "0.0.0.0"
      }
    }
  ]
}
This now starts the statemachine on all interfaces of your machine ("bind_address": "0.0.0.0") on port 9099.
Now navigate to http://localhost:9099/metrics. After the sensor sent its first metrics, you will see something like:
my_dummy_sensor_my_sensor_value_inbound{prefix="my_dummy_sensor",key="my_sensor_value"} -1 1779285321560
my_dummy_sensor_my_sensor_value_value{prefix="my_dummy_sensor",key="my_sensor_value",unit="°C"} 0.7934803587425656 1779285321560
my_dummy_sensor_my_sensor_value_raw_value{prefix="my_dummy_sensor",key="my_sensor_value",unit="°C"} 0.7934803587425656 1779285321560
If you want to continue with the setup of your realtime hardware, continue with the Atomiq tutorial…
If you want to learn more about how to deploy HEROS in production, continue with Deploying BOSS in Production…