Deploying BOSS in Production
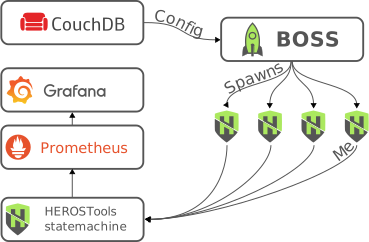
In the Getting Started with HEROS tutorial, we learned how to set up individual HEROs and interact with them. This tutorial builds upon that foundation and shows you how to deploy HEROS and BOSS in production environments. We’ll cover containerized deployment, database-backed configuration, monitoring, and multi-instance setups.
Prerequisites
Before starting this tutorial, ensure you have:
Completed the Getting Started with HEROS tutorial
Basic Docker knowledge: Understanding of containers, images,
docker run, anddocker-composecommandsFamiliarity with CouchDB concepts (databases, documents, views)
A working HEROS environment
Tip
For managing Docker containers and compose files from a web interface, you can use Arcane. It provides a user-friendly GUI for Docker management, which can be helpful for visualizing and controlling your containerized HEROS deployment.
Using Realms
To isolate groups of HERO objects from other groups the concept of realms exists in HEROS. You can think of it as a namespace where objects in the same namespace can talk to each other while communication across realms/namespaces is not possible.
Warning
Note that this is solely a management feature, not a security feature. By default, all realms share the same zenoh network and can thus talk to each other on a low level. We recommend changing this behavior by the HEROS_SEP_MULTICAST environment variable, which will also be the default in the future.
For a production setup, we strongly recommend to not use the default realm (called heros), but set the realm of all your devices to a descriptive name, like the name of your experiment.
In this tutorial we will use the realm my_realm.
This is done by setting the --realm command line argument of all cli tools using HEROS like boss or the atomiq_master, like
uv run hero-monitor --realm my_realm
or by specifying the realm keyword when interfacing HEROS in code, like
my_hero = RemoteHERO("my_hero", realm="realm")
Setting up CouchDB for BOSS Configuration
CouchDB provides a robust way to store and manage your BOSS device configurations centrally. This allows you to modify configurations without restarting services and enables multi-system deployments.
Installing CouchDB
For production use, we recommend running CouchDB in a Docker container:
# couchdb service
version: '3.8'
services:
  couchdb:
    image: couchdb:latest
    environment:
      COUCHDB_USER: admin
      COUCHDB_PASSWORD: yourpassword
    ports:
      - "5984:5984"
    volumes:
      - couchdb_data:/opt/couchdb/data
    restart: always
Start with:
docker compose up -d couchdb
docker run -d \
  --name couchdb \
  -p 5984:5984 \
  -e COUCHDB_USER=admin \
  -e COUCHDB_PASSWORD=yourpassword \
  -v couchdb_data:/opt/couchdb/data \
  couchdb:latest
Create a database for your BOSS configurations:
Open the CouchDB web interface at
http://localhost:5984/_utilsand loginClick “Create Database” and enter
boss-configsas a name and confirm
curl -X PUT http://admin:yourpassword@localhost:5984/boss-configs
Creating Device Configurations
Now let’s create a device configuration document. This is similar to the JSON file we used in the getting started tutorial, but stored in CouchDB:
Open the CouchDB web interface at
http://localhost:5984/_utilsSelect the
boss-configsdatabaseClick “Create Document”
Enter the following configuration:
{
  "_id": "production_camera",
  "classname": "herosdevices.hardware.dummy.camera.CameraDummy",
  "arguments": {
    "config_dict": {
      "default": {
        "height": 1024,
        "width": 1280,
        "frame_count": -1,
        "auto_trigger": false
      }
    }
  },
  "active": true
}
Click “Create Document” to save
curl -X PUT http://admin:yourpassword@localhost:5984/boss-configs/production_camera \
  -H "Content-Type: application/json" \
  -d '{"classname": "herosdevices.hardware.dummy.camera.CameraDummy", "arguments": {"config_dict": {"default": {"height": 1024, "width": 1280, "frame_count": -1, "auto_trigger": false}}}, "active": true}'
Note
The active field allows you to enable/disable devices without deleting them.
The _id field sets the document ID which will be used as the HERO name.
For more information about BOSS JSON configuration syntax, see JSON Configuration Format.
Creating Views for Device Filtering
Views allow you to filter which devices should be started by BOSS. Here’s a complete example for machine-specific filtering:
Open the CouchDB web interface
Select the
boss-configsdatabaseClick the “+” at “Design Documents” in the left sidebar
Click “New Doc”
In the editor, enter the following views:
{
  "_id": "_design/machine_filter",
  "views": {
    "machine1": {
      "map": "function(doc) { if(doc.active && doc.machine === 'machine1') { emit(doc._id, null); } }"
    },
    "machine2": {
      "map": "function(doc) { if(doc.active && doc.machine === 'machine2') { emit(doc._id, null); } }"
    },
    "all_active": {
      "map": "function(doc) { if(doc.active) { emit(doc._id, null); } }"
    }
  },
  "language": "javascript"
}
Click “Create Document” to save the design document
Save the design document to a file machine_filter_view.json:
{
  "_id": "_design/machine_filter",
  "views": {
    "machine1": {
      "map": "function(doc) { if(doc.active && doc.machine === 'machine1') { emit(doc._id, null); } }"
    },
    "machine2": {
      "map": "function(doc) { if(doc.active && doc.machine === 'machine2') { emit(doc._id, null); } }"
    },
    "all_active": {
      "map": "function(doc) { if(doc.active) { emit(doc._id, null); } }"
    }
  },
  "language": "javascript"
}
Then create the design document:
curl -X PUT http://admin:yourpassword@localhost:5984/boss-configs/_design/machine_filter \
  -H "Content-Type: application/json" \
  -d '@machine_filter_view.json'
This creates multiple views:
machine1: Only devices withmachine: "machine1"andactive: truemachine2: Only devices withmachine: "machine2"andactive: trueall_active: All devices withactive: true(regardless of machine)
You can then use these views in your BOSS commands:
# Start only machine1 devices
uv run boss -u http://admin:pw@couchdb:5984/boss-configs/_design/machine_filter/_view/machine1?include_docs=true
For advanced CouchDB usage patterns with BOSS, refer to CouchDB for BOSS.
Containerized BOSS Deployment
Running BOSS in containers provides isolation, easier deployment, and better resource management. We provide pre-built Docker images for all components, so you don’t need to create your own Dockerfiles.
The recommended approach is to use our official pre-built images from our GitLab registry.
We provide images for herostools (registry.gitlab.com/atomiq-project/herostools:latest), herosdevices (registry.gitlab.com/atomiq-project/herostools:latest)
or standalone boss (registry.gitlab.com/atomiq-project/boss:latest) if you don’t need anything from the herostools or herosdevices extensions.
Create a docker-compose.yml file:
version: '3.8'

services:
  boss-production:
    image: registry.gitlab.com/atomiq-project/herostools:latest
    restart: always
    network_mode: host
    command: python -m boss.starter -u http://admin:yourpassword@couchdb:5984/boss-configs/_design/active_devices/_view/active?include_docs=true --expose --name BOSS-production --realm my_realm
Start the service:
docker compose up -d
Run BOSS directly with docker run:
docker run -d \
  --name boss-production \
  --network host \
  registry.gitlab.com/atomiq-project/herostools:latest \
  python -m boss.starter -u http://admin:yourpassword@couchdb:5984/boss-configs/_design/active_devices/_view/active?include_docs=true --expose --name BOSS-production --realm my_realm
Important
The network_mode: host (or --network host) is required for proper HEROS discovery.
HEROS uses multicast for service discovery, which doesn’t work with Docker’s default bridge networking.
For more details on HEROS realms and network configuration, see Configuring HEROS.
Note
The --expose flag makes the BOSS instance discoverable in the network,
and --name sets a custom name for this BOSS instance.
Running Multiple Instances of BOSS
You can run multiple BOSS instances to:
Distribute devices across multiple machines
Group devices logically (e.g., by subsystem)
Update configurations independently without disrupting all services
Multi-Machine Deployment
To deploy BOSS on multiple systems from the same CouchDB you can use the views defined above to filter devices per machine: Here’s how to start BOSS instances on different machines:
version: '3.8'

services:
  boss-machine1:
    image: registry.gitlab.com/atomiq-project/herostools:latest
    restart: always
    network_mode: host
    command: python -m boss.starter -u http://admin:yourpassword@couchdb:5984/boss-configs/_design/machine_filter/_view/machine1?include_docs=true --expose --name BOSS-machine1 --realm my_realm
docker compose -f docker-compose-machine1.yml up -d
docker run -d \
  --name boss-machine1 \
  --network host \
  registry.gitlab.com/atomiq-project/herostools:latest \
  python -m boss.starter -u http://admin:yourpassword@couchdb:5984/boss-configs/_design/machine_filter/_view/machine1?include_docs=true --expose --name BOSS-machine1 --realm my_realm
version: '3.8'

services:
  boss-machine2:
    image: registry.gitlab.com/atomiq-project/herostools:latest
    restart: always
    network_mode: host
    command: python -m boss.starter -u http://admin:yourpassword@couchdb:5984/boss-configs/_design/machine_filter/_view/machine2?include_docs=true --expose --name BOSS-machine2 --realm my_realm
docker compose -f docker-compose-machine2.yml up -d
docker run -d \
  --name boss-machine2 \
  --network host \
  registry.gitlab.com/atomiq-project/herostools:latest \
  python -m boss.starter -u http://admin:yourpassword@couchdb:5984/boss-configs/_design/machine_filter/_view/machine2?include_docs=true --expose --name BOSS-machine2 --realm my_realm
Monitoring with Prometheus and Grafana
Monitoring your HERO datasources is crucial for a modern lab. We’ll use Prometheus for metrics collection and Grafana for visualization in this tutorial. Other backends are supported or easily implementable.
Setting up the StateMachine
Add the HERODatasourceStateMachine to your CouchDB configuration:
Open the CouchDB web interface at
http://localhost:5984/_utilsSelect the
boss-configsdatabase from the dropdownClick “Create Document” and then “New Doc”
Enter the following configuration:
{
  "_id": "statemachine",
  "classname": "herostools.actor.statemachine.HERODatasourceStateMachine",
  "arguments": {
    "loop": "@_boss_loop",
    "http_port": 9099,
    "bind_address": "0.0.0.0"
  },
  "active": true
}
Click “Create Document” to save
curl -X PUT http://admin:yourpassword@localhost:5984/boss-configs/statemachine \
  -H "Content-Type: application/json" \
  -d '{"classname": "herostools.actor.statemachine.HERODatasourceStateMachine", "arguments": {"loop": "@_boss_loop", "http_port": 9099, "bind_address": "0.0.0.0"}, "active": true}'
This will expose metrics on port 9099 that Prometheus can scrape.
For more information about the HERODatasourceStateMachine and its configuration options,
see Setup.
Configuring Prometheus
Create a prometheus_config/prometheus.yml configuration file:
global:
  scrape_interval: 15s

scrape_configs:
   - job_name: 'heros-datasources'
       scrape_interval: 5s
       metrics_path: /metrics
       static_configs:
       - targets: ['172.17.0.1:9099']
           labels:
           group: 'heros'
Note
The target IP 172.17.0.1 given here targets the docker host, which is required since the aggregator (statemachine) runs in the host network.
Run Prometheus in a container:
Add to your docker-compose.yml (see Putting It All Together for full working compose file):
# prometheus service
prometheus:
  image: prom/prometheus:latest
  ports:
    - "9090:9090"
  command:
    - --config.file=/etc/prometheus/prometheus.yml
    - --storage.tsdb.retention.time=10y
  volumes:
    - prometheus_data:/prometheus
    - ./prometheus_config:/etc/prometheus
  restart: always
Then start with:
docker compose up -d prometheus
docker run -d \
  --name prometheus \
  -p 9090:9090 \
  -v $(pwd)/prometheus_config:/etc/prometheus \
  prom/prometheus --config.file=/etc/prometheus/prometheus.yml --storage.tsdb.retention.time=10y
Setting up Grafana
Run Grafana and connect it to Prometheus (see Putting It All Together for full working compose file):
Add to your docker-compose.yml:
# grafana service
grafana:
  image: grafana/grafana:latest
  ports:
    - "3000:3000"
  depends_on:
    - prometheus
  volumes:
    - grafana_data:/var/lib/grafana
  restart: always
Then start with:
docker compose up -d grafana
docker run -d \
  --name grafana \
  -p 3000:3000 \
  -v grafana_data:/var/lib/grafana \
  grafana/grafana
Access Grafana at http://localhost:3000 (default credentials: admin/admin) and:
Add Prometheus as a data source (URL:
http://prometheus:9090)Create dashboards to visualize your HERO metrics
Tip
The metrics exposed by HERODatasourceStateMachine include device status, observable values,
and other useful information for monitoring your system health.
Putting It All Together
Here’s a complete docker-compose.yml example that ties everything together:
version: '3.8'

services:
  couchdb:
    image: couchdb:latest
    environment:
      COUCHDB_USER: admin
      COUCHDB_PASSWORD: yourpassword
    ports:
      - "5984:5984"
    volumes:
      - couchdb_data:/opt/couchdb/data
    restart: always

  boss:
    image: registry.gitlab.com/atomiq-project/herostools:latest
    depends_on:
      - couchdb
    network_mode: host
    command: python -m boss.starter -u http://admin:yourpassword@couchdb:5984/boss-configs/_design/active_devices/_view/active?include_docs=true --expose --name BOSS-production --realm my_realm
    restart: always

  prometheus:
    image: prom/prometheus:latest
    ports:
      - "9090:9090"
    command:
      - --config.file=/etc/prometheus/prometheus.yml
      - --storage.tsdb.retention.time=10y
    volumes:
      - prometheus_data:/prometheus
      - ./prometheus.yml:/etc/prometheus/prometheus.yml
    restart: always

  grafana:
    image: grafana/grafana:latest
    ports:
      - "3000:3000"
    depends_on:
      - prometheus
    volumes:
      - grafana_data:/var/lib/grafana
    restart: always

volumes:
  couchdb_data:
  prometheus_data:
  grafana_data:
To start everything:
docker-compose up -d
Note
Remember that the BOSS service uses network_mode: host for proper multicast discovery,
while other services can use the default bridge networking.
Resources
Learn more about BOSS JSON configuration
Explore HEROS realms configuration
Check out herostools documentation for more monitoring and flow tools
Read about herosdevices () for real device drivers
For advanced event handling patterns, see Events
Tip
For complex deployments, consider using environment-specific CouchDB databases
(e.g., boss-configs-dev, boss-configs-prod) to separate configurations.