Getting Started with Atomiq
This guide is the best way to get you started with the realtime part of the Atomiq One software stack. If you want to start with the non-realtime part (cameras, lasers, monitoring, …), jump to Getting Started with HEROS first.
Atomiq is a convenience layer above the ARTIQ real-time experiment control system. It mainly provides an abstraction layer that allows you to move hardware-specific information (like what device is plugged into what) into a configuration and to work with generic software objects that represent the actual hardware in the lab (like AOMs, coils, lasers, etc.). You can find the full Atomiq () documentation online.
Atomiq is based on three core concepts:
Components – Put the hardware information of your setup into a configuration file. Work with high-level objects like
AOM,Laser, orCoilinstead of raw Sinara devices. Set quantities in physically meaningful units and attach calibrations.Blocks – Reusable, recursive sub-experiments. Write a sequence (e.g. MOT loading, imaging) once and reuse it in all your experiments.
Chunking – Group multiple experiment runs into a single ARTIQ kernel to reduce the overhead of kernel compilation and loading, enabling fast repetition rates above 1 Hz.
On top of that, Atomiq is natively and tightly integrated into HEROS ().
You can use any HERO (network-transparent hardware object) directly as a component in your experiment by prefixing its name with $.
The Atomiq scheduler and experiment database are themselves HEROs, so you can schedule experiments, monitor their progress,
and stream data out of running experiments.
A basic understanding of a few tools and concepts is assumed, so we recommend familiarising yourself with the following topics:
Tool / Concept |
Description |
|---|---|
A container ecosystem to run software consistently on different environments. |
|
A modern Python virtual environment manager. |
|
CLI |
Basic usage of a command line interface like bash. |
The real-time experiment control system that Atomiq builds upon. Basic familiarity with ARTIQ concepts (device database, experiments, kernels) is helpful but not strictly required. |
Tip
Also check out our “Atomiq Deep Dive” webinar!
Setting up Atomiq
Atomiq provides Docker images that bundle everything needed to run Atomiq inside the ARTIQ ecosystem. This is the easiest way to get Atomiq and ARTIQ running in a few simple steps.
Note
We do not support nor recommend running the Atomiq master on Windows. The HEROS connections depend strongly on the Windows version, the hypervisor used, and probably the weather.
Create a new folder for your Atomiq project. In this tutorial we call it my_atomiq_lab:
mkdir my_atomiq_lab
cd my_atomiq_lab
Inside this folder, create a docker-compose.yml file:
services:
  artiq-master:
    container_name: "artiq-master"
    image: registry.gitlab.com/atomiq-project/atomiq:stable
    restart: unless-stopped
    network_mode: "host"
    volumes:
      - ".:/experiment" # this should point to the folder where the device_db and the repository is located
      # - ".:/git/atomiq" # use the local atomiq installation
      # - "/path/to/some_package:/git/custom/some_package" # include custom python code

    # master command (see atomiq_master doc for more options)
    command: ["python", "-m", "atomiq.frontend.atomiq_master", "--bind", "*", "-r", "/experiment/repository", "--device-db", "/experiment/device_db.py", "--name", "my_master", "--heros-realm", "my_realm"]
  artiq-ctlmgr:
    container_name: "artiq-ctlmgr"
    image: registry.gitlab.com/atomiq-project/atomiq:stable
    restart: unless-stopped
    network_mode: "host"
    depends_on:
      artiq-master:
        condition: service_healthy
    command: ["artiq_ctlmgr", "--bind", "*"]
Important
The network_mode: "host" is required for proper HEROS discovery.
HEROS uses multicast for service discovery, which does not work with Docker’s default bridge networking.
If you cannot use host networking, you can alternatively specify --heros-connect tcp/<IP_OR_HOSTNAME>:7447
in the master command and run a zenoh router as a peer.
Note
The --name flag sets a custom name for this Atomiq master instance. The --heros-realm flag (defaults to heros)
sets the HEROS realm of all Atomiq-related HEROs.
In this tutorial we use the realm my_realm.
Tip
In this host-network configuration, the host arguments of core_log, core_moninj, and core_analyzer
in your device_db.py must be set to "localhost".
Start the services:
docker compose up -d
You now have a fully featured ARTIQ-compatible master running, with all Atomiq extensions enabled.
Tip
Learn more about all installation options (Docker run, macvlan, custom code) in the installation docs.
Setting up your first Atomiq project
An Atomiq project consists of the following parts:
my_atomiq_lab/
├── docker-compose.yml      # starts the atomiq master and ctlmgr
├── device_db.py            # ARTIQ device database + atomiq components
├── components.py           # atomiq component definitions
└── repository/             # your experiment scripts
    └── my_experiment.py
The device_db.py is the standard ARTIQ device database
with one addition: the components key holds the Atomiq component definitions.
Create a minimal device_db.py for your setup. Below is an example for a Kasli system with a Urukul DDS, a Sampler ADC, and some TTL outputs.
Adjust the core_addr to the IP address of your Kasli:
Tip
The components_import_helper function makes sure that changes to your components.py file are properly
detected when the ARTIQ master rescans the device database at runtime. Always use it when importing components
from a separate file.
Note
Changes to the device db (and thus the Atomiq components) only become available after the ARTIQ master rescanned
the device_db.py. This can be triggered by running artiq_client -s <ARTIQ_MASTER_HOST> scan-devices or
through the corresponding option when right-clicking the “explorer” view in the ARTIQ dashboard.
Defining your components
The Atomiq components are a mechanism to put the complexity of your experimental setup into a configuration and to work with the setup at a higher abstraction level. The key ideas are:
Have abstract, generic classes to represent different types of lab equipment (e.g.
RFSource,DAC,AOM,Coil,Laser).Derive more specific classes from the generic ones. For example, a channel of the Sinara Urukul is an
RFSource, but so is a standalone AOM driver controlled by analog voltages. This allows you to easily replace components in a running experiment.Reference other components, sinara devices, and HEROs in a component definition and recursively build all needed components.
Create a components.py file in your project folder. Here we define a laser cooling setup with an AOM driven by a Urukul DDS channel and a Sampler ADC for voltage readout:
Each entry in the components dict is identified by a name that you can choose freely.
Note
Since the component dict is flat, it makes sense to think about a proper naming scheme like
<component_type>_<component_name> (e.g. aom_cooler, pd_repumper, coil_north, dds_cooler, etc.).
Every component needs to define a classname which defines the class the software object should have.
The arguments field takes the parameters that are needed to create the object.
Typically Atomiq components rely on other components to do their job. Such interconnections are provided by starting an argument value with a special prefix:
&refers to another component in the components dict (e.g."rfsource": "&dds_cooler")@refers to a device in your ARTIQ device_db.py (e.g."ttl": "@ttl4")$refers to a HERO in the HEROS network (e.g."$my_camera") – more on this later
When creating the objects from the configuration, Atomiq detects these references and recursively builds the components required by the component you need.
Tip
Every component accepts the argument debug_output (default: False). To debug the behavior of a single component,
set "debug_output": True in its arguments in the components dict to switch on its verbose kernel-side logging.
Tip
Atomiq comes with a lot of ready-to-use component classes. Browse the full list in the atomiq components documentation.
Writing your first experiment
Now let’s write our first Atomiq experiment. Create a repository folder and inside it a file my_experiment.py:
from atomiq import AtomiqExperiment
from artiq.experiment import kernel, parallel


class LaserCoolExample(AtomiqExperiment):
    """A simple laser cooling experiment."""

    # Define components needed in the experiment. They will be built and attached to
    # the experiment object automatically. If components depend on others, these are also
    # built and initialized automatically but not attached to the experiment object.
    components = ["aom_cooler", "ttl_cool"]

    # Define experiment arguments. Scannable arguments can be scanned in the dashboard.
    arguments = {
        "on_time": {"default": 5e-6, "unit": "us", "ndecimals": 3},
        "amplitude": {"default": 0.3, "scale": 1, "precision": 3},
    }

    @kernel
    def step(self, point):
        self.log.info("Starting step with on_time {}s", (point.on_time,))

        # Set the AOM frequency and amplitude
        self.aom_cooler.detune(3e6)
        self.aom_cooler.set_amplitude(point.amplitude)

        # Switch on the AOM and the TTL simultaneously
        with parallel:
            self.aom_cooler.on()
            self.ttl_cool.pulse(point.on_time)

        self.aom_cooler.off()
Let’s break this down:
componentsis a class-level list of component names from yourcomponentsdict in thedevice.db. Atomiq automatically builds these components (and their dependencies) and attaches them as attributes to your experiment (e.g.self.aom_cooler).argumentsdefines the experiment arguments. By default, arguments are scannable (you can scan over them in the dashboard). Use"type": "int"for non-scannable integer arguments, or"type": "bool"for boolean switches.step()is the main kernel method, decorated with@kernel. It receives apointobject that gives access to the current scan point’s argument values (e.g.point.on_time).
Tip
Learn more about all available argument keywords (units, scales, precision, ranges, groups, etc.) in the arguments documentation. You can also load experiment arguments from external sources like a JSON file or a database using custom argument providers. See the Argument providers example for how to implement your own.
Note
Atomiq does not handle the initialization procedure required by some of the Sinara hardware after power cycling to ensure a fast cycle time. Please refer to the ARTIQ documentation for device initialization.
Running the experiment
To run your experiment, you need the Atomiq dashboard. You can install it on any machine that can reach your Atomiq master via network:
uv venv
uv pip install git+https://gitlab.com/atomiq-project/atomiq[gui-stable]
uv run atomiq_dashboard -s <ARTIQ_MASTER_IP_OR_HOSTNAME>
Replace <ARTIQ_MASTER_IP_OR_HOSTNAME> with the IP address or hostname of the machine running your Atomiq master.
Tip
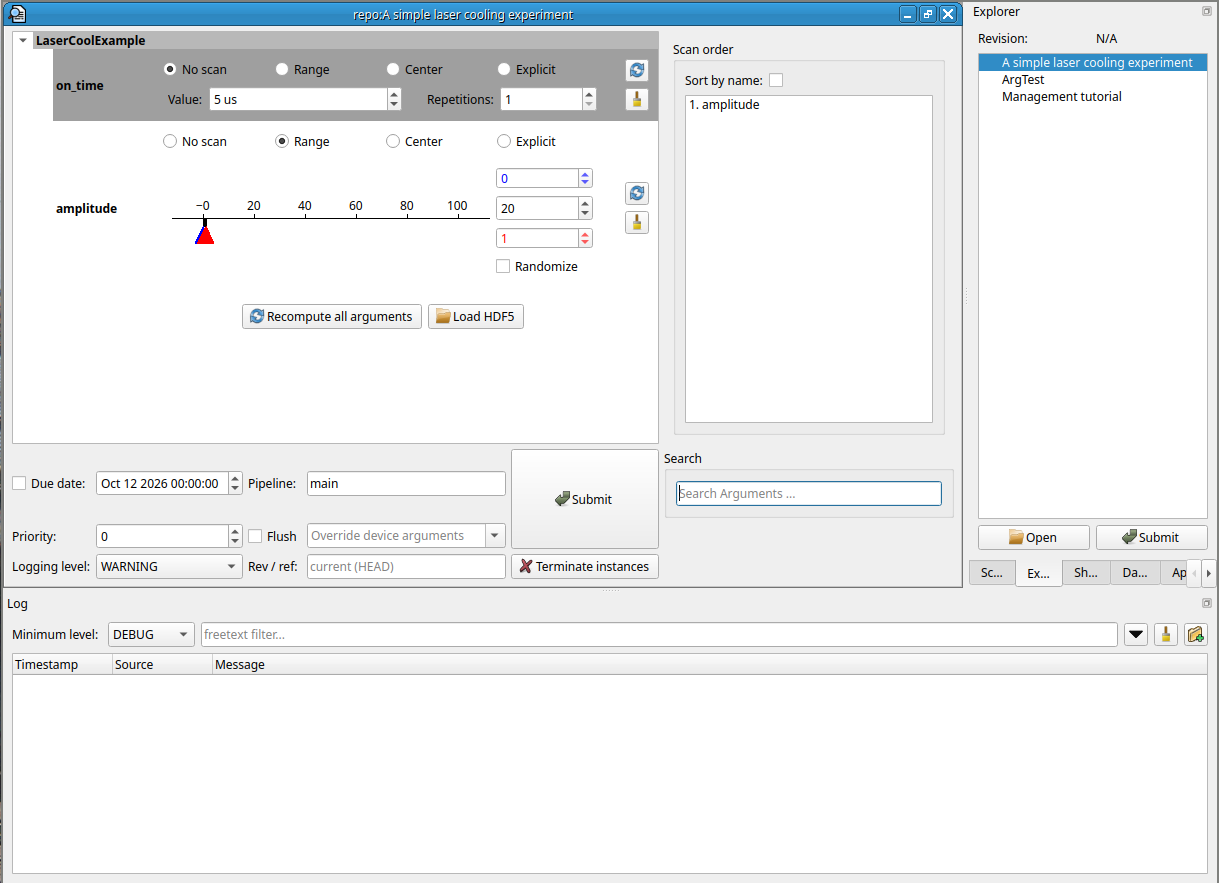
The Atomiq dashboard is a modified version of the ARTIQ dashboard with several improvements:
Scannable parameters take up much less space when set to “No Scan”.
Drag-and-drop scan order configuration. Arguments higher in the list are scanned first (inner loop).
Parameter search bar to quickly find experiment arguments.
Better scroll behaviour and alternating parameter row highlighting.
Learn more in the frontend docs.
In the dashboard, you will see your LaserCoolExample experiment in the explorer. Select it, set your arguments,
and click “Submit” to run it.
Making it reusable with Blocks
In Atomiq you can define so-called blocks which can be used as black boxes within other Atomiq experiments or other Atomiq blocks. This allows you to work out a part of your sequence (e.g. MOT loading, transfer, imaging) once and then reuse it easily in all your other experiments.
To turn our cooling sequence into a block, create a my_blocks folder with an empty __init__.py file and a
cooling.py file:
my_atomiq_lab/
├── ...
├── my_blocks/
│   ├── __init__.py       # empty file, tells Python this is a module
│   └── cooling.py
└── repository/
    └── my_experiment.py
We copy the content of our my_experiment to cooling.py:
from atomiq import AtomiqBlock
from artiq.experiment import kernel, parallel


class LaserCooling(AtomiqBlock):
    """A reusable laser cooling block."""

    components = ["aom_cooler", "ttl_cool"]

    arguments = {
        "on_time": {"default": 5e-6, "unit": "us", "ndecimals": 3},
        "amplitude": {"default": 0.3, "scale": 1, "precision": 3},
    }

    @kernel
    def step(self, point):
        self.log.info("Starting cooling step with on_time {}s", (point.on_time,))

        self.aom_cooler.detune(3e6)
        self.aom_cooler.set_amplitude(point.amplitude)

        with parallel:
            self.aom_cooler.on()
            self.ttl_cool.pulse(point.on_time)

        self.aom_cooler.off()
Making a block from an experiment is as simple as replacing AtomiqExperiment with AtomiqBlock
Now update your experiment to use the block:
from atomiq import AtomiqExperiment
from artiq.experiment import kernel, delay, ms

from my_blocks.cooling import LaserCooling


class LaserCoolExample(AtomiqExperiment):
    """A simple experiment using the LaserCooling block."""

    blocks = [LaserCooling]

    @kernel
    def step(self, point):
        # Call the block's step method
        self.LaserCooling.step(point)

        # More experiment code here...
        delay(10 * ms)
To use a block, add it to the class-level blocks list. Atomiq takes care of all the housekeeping (initialization
of the needed components and recursive block initialization) and imports all the block members (functions and attributes)
to your experiment. You can then call the block’s methods via self.LaserCooling.step(point).
Tip
Blocks can implement the same phases as the base experiment, which are
automatically called when the experiment is run. An exception is the step() method, which must be called explicitly.
More to that later
Tip
You can also use the same block multiple times with different component mappings and aliases:
blocks = [
    (Imaging, {"ttl_trigger": "ttl_cool"}, "Image1"),
    (Imaging, {"ttl_trigger": "ttl_camera"}, "Image2"),
]
Learn more in the blocks documentation and the Blocks modular example.
Tip
To make custom Python modules available inside the Docker container, mount them into /git/custom:
volumes:
  - "/path/to/my_blocks:/git/custom/my_blocks"
This directory is in the Python path and every Python file in it can be imported.
Phases and Chunking
Very fast experiments with a high repetition rate (>1 Hz) are challenging. A particular problem is the time it takes the core device to switch from one run/kernel to the next. Atomiq tries to reduce this overhead by grouping together different runs in so-called chunks. Runs within a chunk are packed into the same ARTIQ kernel and are thus executed back-to-back without the timing overhead of compiling a new kernel.
In principle one would like to pack all runs into a single kernel, but memory on the core device is limited, and thus
we have to compromise and find a reasonable CHUNKSIZE that can be overwritten as a class-level attribute:
class MyExperiment(AtomiqExperiment):
    CHUNKSIZE = 10
    ...
Atomiq implements several phases during the original ARTIQ run phase to optimally embed chunking and provide a
fast, yet flexible interface. Each of these phases can be used in your experiment by implementing a method of the
corresponding name:
Phase |
Type |
Description |
|---|---|---|
|
Kernel |
Executed once at the beginning of the run phase. Also executed again before continuing with the next chunk if an error occurred. |
|
Host |
Executed once at the beginning of the run phase. Use for slow device initialization. |
|
Kernel |
Executed once at the end of the run phase. Bring hardware into a safe state. |
|
Host |
Executed once at the end of the run phase. Disconnect or power down external devices. |
|
Kernel |
Executed before each chunk. Run fast calibrations. |
|
Host |
Executed before each chunk. Configure external devices for the upcoming chunk. |
|
Kernel |
Executed after each chunk. Save data or perform chunk-specific cleanup. |
|
Host |
Executed after each chunk. Reset or adjust external devices. |
|
Kernel |
Executed before each step. E.g. reset laser stabilization integrators. |
|
Kernel |
Main experiment phase. This is where your experiment sequence goes. |
|
Kernel |
Executed after each step. E.g. save data collected during the step. |
Warning
All kernel phases in your experiment (and your blocks) must be decorated with the @kernel decorator.
Note
All phases can be implemented also in blocks. They are executed automatically
just like the ones in the main experiment. One exception is the step method, which is not automatically called.
The chunk and step phases provide information about the current scan point(s) via the point (or points for the
chunk phases) argument.
The values of experiment arguments of the current step can
be accessed via point.my_argument. Additionally, the following attributes are provided:
point.step_counter: The overall sequential number of the point, starting from 0.point.run_id: The ARTIQ RID, the overall sequential number of the experiment.point.identifier: A unique identifier of the run.
Tip
In the chunk phases (prechunk, postchunk, prechunk_host, postchunk_host), the points argument
is a Chunk (host phases) or KernelChunk (kernel phases) object
that contains all scan points of the current chunk. You can access attributes that are constant across the chunk
directly via points.my_argument. Atomiq automatically checks consistency: if you try to access an attribute that
varies within the chunk, a RuntimeError is raised. To iterate over individual points in kernel phases, use
points.to_list().
Here is an example using several phases:
from atomiq import AtomiqExperiment
from artiq.experiment import kernel, delay, ms

from my_blocks.cooling import LaserCooling


class CoolImagingExample(AtomiqExperiment):
    """Cooling followed by imaging, using phases."""

    blocks = [LaserCooling]

    components = ["ttl_cool"]

    arguments = {
        "cooling_time": {"default": 5e-6, "unit": "us", "ndecimals": 3},
    }

    @kernel
    def prerun(self):
        # Kernel-side initialization, runs once per run
        self.log.info("Experiment starting")

    def prerun_host(self):
        # Host-side initialization, runs once per run
        # e.g. configure a slow camera here
        pass

    @kernel
    def prechunk(self, points):
        # Runs once per chunk, before the steps
        # points is a KernelChunk; access invariant attributes directly
        self.log.info("Starting chunk with cooling_time {}s", (points.cooling_time,))

    @kernel
    def step(self, point):
        # Main experiment sequence
        self.LaserCooling.step(point)
        self.ttl_cool.pulse(10 * ms)

    @kernel
    def poststep(self, point):
        # Runs after each step
        self.log.info("Step {} done", (point.step_counter,))

    @kernel
    def postrun(self):
        # Kernel-side cleanup, runs once per run
        self.log.info("Experiment finished")
Tip
Learn more about phases, chunking, and accessing scan point information in the chunking documentation and scan point docs.
Integrating HEROS
Atomiq is perfectly suited to describe and control the realtime hardware in your setup. However, a good deal of the hardware orchestration concerns non-realtime devices that are not directly connected to the realtime control system. To make all these devices available in your Atomiq experiments, the HEROS () framework is used. The idea behind HEROS is that every hardware object becomes a software object that can be transparently accessed via the network.
If you haven’t already, we recommend completing the Getting Started with HEROS tutorial first to set up your non-realtime devices.
Using HEROs as components
Using an available HERO in your Atomiq experiment is as easy as putting its name into your components list, prefixed with $.
Let’s assume there is a camera available as a HERO with the name my_camera in the HEROS realm my_realm
(the realm you set with --heros-realm when starting the Atomiq master):
from atomiq import AtomiqExperiment
from artiq.experiment import kernel, us

from my_blocks.cooling import LaserCooling


class CoolImagingExample(AtomiqExperiment):
    """Cooling followed by camera imaging."""

    blocks = [LaserCooling]

    components = ["$my_camera", "ttl_cool"]

    arguments = {
        "exposure_time": {"default": 100e-6, "unit": "us", "ndecimals": 3},
    }

    def prerun_host(self):
        # Configure the camera from the host side
        self.my_camera.stop()
        self.my_camera.update_configuration(
            {"default": {"exposure_time": self.exposure_time.value}}
        )
        self.my_camera.configure(
            "default",
            metadata={"save_name": "MOTImage", "n_images": 1},
        )
        self.my_camera.arm()

    @kernel
    def step(self, point):
        # Run the cooling block
        self.LaserCooling.step(point)

        # Hardware trigger for the camera
        self.ttl_cool.pulse(2 * us)

        # Software trigger via RPC
        self.my_camera.start()
Any HERO imported this way inherits from Component inside Atomiq. However, if the HERO specifies in its metadata
that it is compatible with a more specific class inside Atomiq, then it is based off this more specific class and
Atomiq assumes that the necessary interface exists in the HERO. This way, it is possible to have non-realtime devices
like RF sources, voltage and current sources, ADCs, simple switches, etc. look exactly like their realtime counterparts
from a software perspective.
Note
Dashes - in the HERO name are replaced by _ in the attribute name. E.g. $my-camera becomes
available as self.my_camera.
Tip
Inside Atomiq, you can use all methods, attributes, and events that the HERO exposes. If your HERO carries proper type annotations, you can also access the HERO from within kernel code sections (this issues an RPC call into the ARTIQ master which then calls the HERO).
Learn more in the HEROS in Atomiq documentation.
Broadcasting data with HEROSink
Now we can run experiments, build blocks and use HEROS. In the Getting Started with HEROS tutorial we also learned
how to emit and process data from HEROs using events. In Atomiq we have a similar mechanism to emit data from an experiment
(including from kernel sequences) using a HEROSink. This is very useful to get data about the current experiment
and progress of scanning, or measuring adc voltages. With this mechanism, we can fully abandon the ARTIQ .h5 file mechanism
and instead store everything in easily indexable S3 compatible storage and databases. You can learn more about that in
the Evaluation and Data Storage tutorial.
To broadcast data from your experiment into the HEROS network, add a HEROSink component:
components["herosink"] = {
    "classname": "atomiq.components.basics.datasink.HEROSink"
}
Then use it in your experiment or block:
from atomiq import AtomiqBlock
from artiq.experiment import kernel, parallel


class LaserCooling(AtomiqBlock):

    components = ["aom_cooler", "ttl_cool", "herosink", "sampler0_ch0"]

    arguments = {
        "on_time": {"default": 5e-6, "unit": "us", "ndecimals": 3},
        "amplitude": {"default": 0.3, "scale": 1, "precision": 3},
    }

    @kernel
    def step(self, point):
        # Emit the current argument values as environment data
        self.herosink.submit_env(point)

        # Measure the input voltage and emit it as custom data
        voltage = self.sampler0_ch0.measure()
        self.herosink.submit_data(["my_input_voltage"], [voltage])

        # ... rest of the cooling sequence
Tip
The submit_env method emits the values of all experiment arguments for the current step, together with metadata
like timestamp, run_id, step_counter, and identifier. Learn more about the
HEROSink class.
Monitoring running experiments
All running experiments are HEROs as well. This allows you to interact with the living experiment
from remote.
To gather the emitted data we have to subscribe to the emit_data event of the experiment HERO.
The following script watches for experiment start/end events on the scheduler and collects all data emitted by
the running experiment. Note that collect_data receives both submit_env data (containing the argument values
like on_time) and submit_data data (containing the measured my_input_voltage):
from heros import EventObserver, RemoteHERO

on_times = []
my_input_voltages = []


def collect_data(data):
    print("Received:", data)
    if "on_time" in data:
        on_times.append(data["on_time"])
    if "my_input_voltage" in data:
        my_input_voltages.append(data["my_input_voltage"])


def experiment_started(origin: str, metadata: dict):
    global on_times, my_input_voltages
    print(f"Experiment {metadata['name']} started (RID {metadata['rid']})")
    on_times = []
    my_input_voltages = []
    experiment_hero = RemoteHERO(metadata["hero_name"], realm="my_realm")
    experiment_hero.emit_data.connect(collect_data)


def experiment_ended(origin: str, metadata: dict):
    print(f"Experiment finished. Collected {len(on_times)} data points:")
    print("on_times:", on_times)
    print("my_input_voltages:", my_input_voltages)


start_observer = EventObserver("atomiq-scheduler-my_master", "run_started", realm="my_realm")
end_observer = EventObserver("atomiq-scheduler-my_master", "run_ended", realm="my_realm")
start_observer.register_callback(experiment_started)
end_observer.register_callback(experiment_ended)
Run it with:
uv run experiment_monitor.py
and watch the output.
Tip
The Atomiq scheduler and experiment database are HEROs themselves. This allows you to schedule experiments programmatically, duplicate runs, and interact with running experiments from any machine on the network. Learn more in the HEROS in Atomiq documentation.
Where to go from here
Congratulations! You now know the core concepts of Atomiq: components, blocks, chunking/phases, and the HEROS integration. Here are some suggestions for what to explore next:
More components: Browse the full list of available component classes in the atomiq components documentation. You will find classes for lasers, locks, coils, photodiodes, cameras, current/voltage sources, calibrations, optimizers, and all supported Sinara hardware.
More examples: Check out the example experiments for AOM control, laser stabilization (SuServo), coil ramps, bisection optimization, ULE locking with Mirny, HEROS integration, data sinks, and more.
Argument providers: Load experiment arguments from external sources like a database. See the Argument providers example.
Evaluation and Data Storage: Learn how to store, evaluate, and visualize your experiment data. See the Evaluation and Data Storage tutorial.
HEROS and BOSS: If you haven’t already, complete the Getting Started with HEROS tutorial to set up your non-realtime hardware, and the Deploying BOSS in Production tutorial for production deployments with CouchDB, Prometheus, and Grafana.
HERO Monitor: Use the HERO Monitor to interactively explore and control all HEROs in your network, including your Atomiq scheduler and running experiments.
Observables: Learn about monitoring and observables for continuous state monitoring.
Webinar recordings: Watch our webinars for guided deep dives into Atomiq and HEROS.
Get in touch: Need support, custom developments, or integrations? Contact us.